 Follow
 Safety / Security Window Film, 12 Mil Clear, 60″ x 1yd: Sold in one continous roll, by the yard. Safety / Security Window Film, 12 Mil Clear, 60″ x 1yd: Sold in one continous roll, by the yard.
$49.95
|
 12 Mil Security Window Film 30″ Wide x 1yd. Sold by the yard as one continuous roll. 12 Mil Security Window Film 30″ Wide x 1yd. Sold by the yard as one continuous roll.
$45.24
|
 High security window ballistic Film Class 336 (SIZE 5FEET X 10FEET ROLL) with home / office installation kit and instructions – window security film, ballistic film – color clear High security window ballistic Film Class 336 (SIZE 5FEET X 10FEET ROLL) with home / office installation kit and instructions – window security film, ballistic film – color clear
$344.95
|

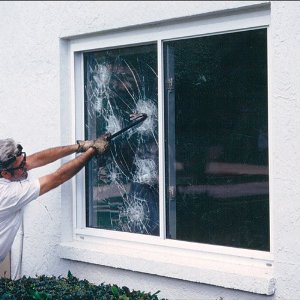
My backdoor consists almost entirely of a window pane, which means any burglar with a hammer, brick, bat, or leather glove could bust the glass up and unlock the door within a second or two. In an effort to supplement my current home defense project, I decided to give the door a little extra muscle by installing a sheet of 12 mil burglar deterrent window security film. I can’t even color within the lines, so I was absolutely dreading putting this stuff on. That said, I got it done, and though it was a little tricky, it wasn’t nearly as awful as I thought it was going to be.
Here’s what you’ll need:
– utility knife
– razor blade scraper
– plastic squeegee tool (this came with the film)
– 32 oz spray bottle
– dishwasher soap
– measuring tape
– clear silicone (caulk gun optional)
– caulk finishing tool and/or a ton of paper towels
First, make your cleaning solution by filling up your 32 oz spray bottle with water, and adding 6-10 drops of Dawn or another mild dish washing solution.
 If the window you’re working on has caulk or another seal around the perimeter, use your razor blade to go around the window and scrape all of it off. Once you’ve removed the bulk of it, wet the window down with your spray bottle, and scrape off any remaining residue. If you’re lucky, you’ll have a huge silicone booger when you’re done like I did.
Clean the rest of your window with the cleaning solution. Clean it like no other window you’ve ever cleaned. You want to make sure you eliminate every speck of dust, fingerprint, and grit mark, otherwise you’ll have to live with it forever. The razor scraper is great for gently scraping off the real nasty stuff – just be careful not to scratch the window.
Measure the height and width of your window. The instructions I used suggested adding 1” on each dimension to give yourself a higher margin for error. Let’s just say I’m very glad I added the extra inch.
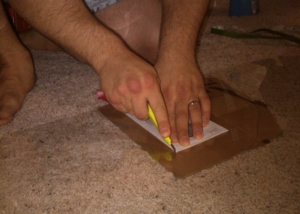 Lay the security film out on the floor and cut it per your measurements using the utility blade (remember to add the extra inch – just in case). I had my wife help me with this part. She insisted that I put a piece of cardboard underneath, so I wouldn’t cut up her new carpet. You might want to do the same if you have a wife who hates it when you destroy her stuff. You don’t have to cut absolutely straight here (you’ll get a chance to clean it up later), but you want to get it pretty close so you don’t leave yourself short (this stuff is to expensive too screw up).
I highly recommend having another person help you with this next step: Have your helper hold the piece of film up with the release liner facing you (the release liner is the extremely thin layer that peels off). With the spray bottle in hand, start peeling the release liner off, while simultaneously spraying the crap out of the sticky side of the security film. The wetter it is, the more time you’re going to to have to work with it, so hit it hard. If this stuff sticks to itself, it’s not fun.
Note: If you can’t get the liner to peel off, you can get it started with a piece of Scotch tape. You can clean off the residue later.
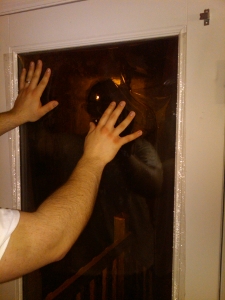 Now, place the wet (soon to be sticky) side of the window security film on the glass. Don’t worry about the overhang – you can trim it in a minute. Immediately spray the surface of the film from head to toe. The wet surface reduces drag from the squeegee.
 Using the plastic squeegee, remove the air bubbles and water from behind the film, dragging it out from the center to the sides. Apply a little bit of pressure to the drag, but don’t press too hard…this is where I screwed up a little – like a meat head, I put way too much pressure on it, and left a bunch of marks and tiny bubbles in a couple places around the perimeter (good thing we’re putting up a curtain).
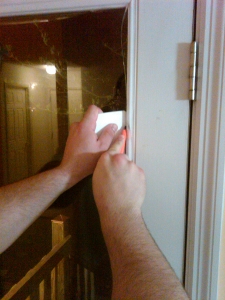
Once you’ve removed all the air bubbles, take your utility knife and the squeegee, and trim the excess film around the perimeter, using the squeegee as a straight edge. It makes it very easy if you move your squeegee hand continuously with your knife hand. The instructions I used say to leave 1/16” around the perimeter for soaking up the water during clean up…this will happen naturally – just cut it – don’t worry about measuring 1/16”.
Take a towel and soak up all the water around the frame to allow the film to properly adhere.
 After waiting a couple days, the security film will be finished sticking to your window, and ready to seal with the silicone. Using a caulking gun, apply a very small bead of silicone (I used clear) around the frame. Silicone is as nasty as it is fantastic. If you’ve never used it, take your time, and get used to the gun before you take it to your window…the stuff is like bacon grease. Once you have a solid bead around the seal, clean it up with the finishing tool, or run a couple paper towels over it.
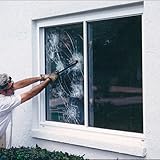
You’re all done! Now all you have to do is grab a video camera and a baseball bat, beat the crap out of it, and send me the results. Never have I wanted so badly to throw a brick at my window before I installed the security window film…you and I now share that same burning desire.